

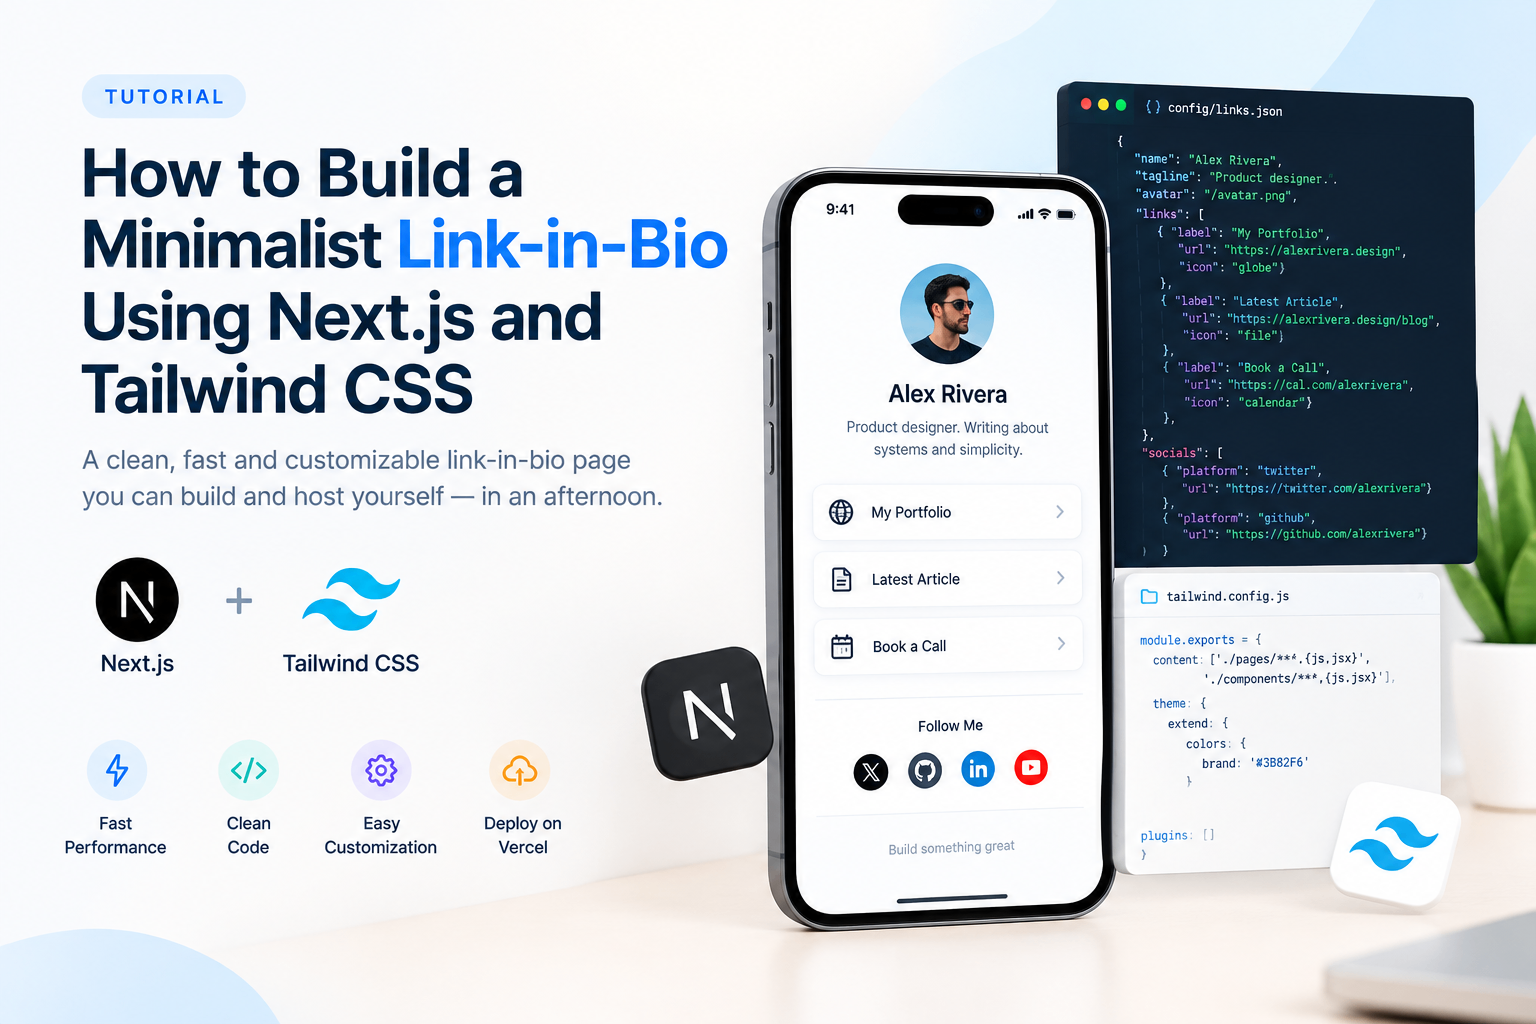
Third-party link tree builders charge monthly fees, own your traffic data, and give you exactly zero control over performance. If you are a developer, there is a better path: build your own Next.js link-in-bio template in an afternoon, host it for free on Vercel, and keep every click metric to yourself.
This article walks you through the full architecture: a data-driven config file, a Tailwind CSS grid layout, and a deployment setup that loads in under a second. By the end, you have a self-hosted bio page you can fork, customize, and extend forever.
Why Developers Are Ditching Third-Party Bio Link Tools
Linktree, Later, and similar platforms solve a real problem fast. But they introduce three costs most developers do not accept for long: recurring subscription fees, tracking pixels you did not place, and page speeds you cannot control.
Page speed matters here more than most people realize. Google's Core Web Vitals research consistently shows that pages loading slower than 2.5 seconds see significantly higher bounce rates. A bio page hosted on a third-party CDN you cannot tune will almost always lose that race.
Building your own solution means you own the HTML, the data, and the routing. If you want to understand the broader concept before diving into code, the complete guide to what a link-in-bio page is and how to make one covers the fundamentals well.
A self-hosted Next.js bio page gives you full control over load speed, analytics, and design. No subscription fees, no forced branding, and no third-party pixels you did not authorize.
What You Need Before You Start
This walkthrough assumes a working knowledge of React and the command line. You do not need to be a Next.js expert, but you should be comfortable with JSX and npm. Here is your starting checklist:
- Node.js 18+ installed locally
- A GitHub account for version control and config management
- A Vercel account for deployment (free tier is enough)
- Basic familiarity with Tailwind utility classes
The official Next.js documentation and the Tailwind CSS documentation are both worth bookmarking. You will reference them as you extend this template beyond the base build.
Project Structure: The Config-First Architecture
The core philosophy here is separation of content from presentation. Your links, name, avatar, and bio text live in a single JSON config file. Your React components read from that file and render accordingly. This means updating your bio page never requires touching component code.
Here is the recommended folder structure:
my-bio-page/
├── config/
│   └── links.json
├── components/
│   ├── Avatar.jsx
│   ├── LinkCard.jsx
│   └── SocialRow.jsx
├── pages/
│   └── index.jsx
├── public/
│   └── avatar.png
├── styles/
│   └── globals.css
└── tailwind.config.js
The links.json file is the only file a non-developer collaborator ever needs to edit. Keep it flat, keep it readable, and commit it to a public or private GitHub repo so changes deploy automatically via Vercel's Git integration.
The config-first architecture separates your link data from your UI logic entirely. One JSON file controls all visible content; components stay clean and reusable across projects.
Step 1: Bootstrap the Project
Scaffold a new Next.js app and install Tailwind in four commands:
npx create-next-app@latest my-bio-page --app --tailwind --eslint
cd my-bio-page
npm install
The --tailwind flag handles the Tailwind config and PostCSS wiring automatically. Delete the boilerplate content inside app/page.jsx (if using the App Router) or pages/index.jsx (Pages Router). This walkthrough uses the Pages Router for maximum hosting compatibility.
Step 2: Define Your Links Config File
Create config/links.json with this structure:
{
  "name": "Alex Rivera",
  "tagline": "Product designer. Writing about systems and simplicity.",
  "avatar": "/avatar.png",
  "links": [
    {
      "label": "My Portfolio",
      "url": "https://alexrivera.design",
      "icon": "globe"
    },
    {
      "label": "Latest Article",
      "url": "https://alexrivera.design/blog/latest",
      "icon": "file"
    },
    {
      "label": "Book a Call",
      "url": "https://cal.com/alexrivera",
      "icon": "calendar"
    }
  ],
  "socials": [
    { "platform": "twitter", "url": "https://twitter.com/alexrivera" },
    { "platform": "github", "url": "https://github.com/alexrivera" }
  ]
}
Keep URLs in this file as full destination URLs. If you want to track clicks and fire retargeting pixels when someone taps a link, swap the destination URLs for short links generated by HitURL. Each short link can carry a Facebook or Google pixel that fires on click, so you build a retargeting audience from your bio page without touching your component code.
Step 3: Build the LinkCard Component
Create components/LinkCard.jsx. This component receives a single link object and renders a full-width button styled with Tailwind:
export default function LinkCard({ label, url }) {
  return (
    <a
      href={url}
      target="_blank"
      rel="noopener noreferrer"
      className="block w-full text-center px-6 py-4 rounded-2xl bg-white text-gray-900 font-medium text-sm tracking-wide border border-gray-200 hover:bg-gray-50 hover:shadow-sm transition-all duration-150"
    >
      {label}
    </a>
  );
}
Keep the component stateless and dependency-free. No animation libraries, no icon packages by default. You can add icons later; start with the leanest version that ships and loads fast.
Step 4: Assemble the Index Page
Open pages/index.jsx and wire everything together:
import linksData from "../config/links.json";
import LinkCard from "../components/LinkCard";
import Head from "next/head";

export default function BioPage() {
  const { name, tagline, avatar, links } = linksData;

  return (
    <>
      <Head>
        <title>{name}</title>
        <meta name="description" content={tagline} />
      </Head>

      <main className="min-h-screen bg-gray-50 flex items-start justify-center px-4 pt-20 pb-16">
        <div className="w-full max-w-sm flex flex-col items-center gap-4">
          <img
            src={avatar}
            alt={name}
            className="w-20 h-20 rounded-full object-cover border-2 border-gray-200"
          />

          <div className="text-center">
            <h1 className="text-lg font-semibold text-gray-900">{name}</h1>
            <p className="text-sm text-gray-500 mt-1">{tagline}</p>
          </div>

          <div className="w-full flex flex-col gap-3 mt-2">
            {links.map((link) => (
              <LinkCard
                key={link.url}
                label={link.label}
                url={link.url}
              />
            ))}
          </div>
        </div>
      </main>
    </>
  );
}
This renders a centered, single-column layout with your avatar, name, tagline, and link buttons. The Tailwind max-w-sm constraint keeps the layout readable on every screen size without a single media query override.
Want to see how this compares to a fully managed bio page before committing to self-hosting? The HitURL bio profiles feature gives you a hosted, trackable link-in-bio page without writing a line of code, which is worth benchmarking your build against.
The Tailwind max-w-sm single-column layout is the most reliable pattern for bio pages. It requires no media queries, renders identically on desktop and mobile, and keeps the user's focus on your links rather than your design.
Step 5: Deploy to Vercel and Wire GitHub Auto-Deploy
Push your project to a GitHub repository. Then go to vercel.com, import the repo, and deploy. Vercel detects Next.js automatically and configures the build with zero settings required.
From this point on, every commit to your main branch triggers a new deployment. Update config/links.json, push, and your bio page reflects the change within 30 seconds. This is The Config-Deploy Loop: your entire content workflow is a JSON edit and a git push.
Vercel's free tier includes custom domains, HTTPS, and edge caching globally. Your bio page will score well on Core Web Vitals out of the box because Next.js handles static optimization automatically when no server-side data fetching is involved.
How to Track Clicks on Your Self-Hosted Bio Page
Tracking is the one area where a self-built page requires extra thought. You have two practical paths.
Path 1: Client-side analytics. Add Plausible, Fathom, or Google Analytics via the Next.js Script component. This gives you page-level data but not per-link click data without additional event instrumentation.
Path 2: Short links with built-in tracking. Replace each destination URL in your config file with a short link that tracks every click individually. This is the cleaner approach for bio pages because it requires no code changes to get per-link analytics, geo data, and device breakdowns. It also lets you fire retargeting pixels on specific links without modifying your React components. For a deeper look at why short links matter in bio contexts, the article on shortening links for Instagram bios and stories explains the mechanics well.
If you want to go further and build a full link shortening microservice that your Next.js app calls directly, the guide on building a Next.js custom link shortener microservice covers the API architecture end to end.
Does a Self-Hosted Bio Page Help SEO?
Yes, more than most developers expect. A bio page on your own domain passes link equity to your other pages rather than leaking it to a third-party subdomain. Search engines index your content under your brand, and you control every meta tag.
The practical SEO wins stack up fast: custom Open Graph tags for social sharing, a sitemap you control, structured data for your name and social profiles, and page speed scores that third-party platforms rarely match. The full breakdown of how to optimize a bio page for search is covered in the link-in-bio SEO optimization guide.
Hosting your link-in-bio page on your own domain keeps all link equity under your brand. Every inbound link pointing to your bio page benefits your domain authority directly, not a third-party platform's.
Set your page title to your name or brand. Write your meta description like a pitch: who you are, what you do, and what someone finds on this page. Add an Open Graph image so your bio link previews well when shared on social platforms.
Extending the Template: What to Add Next
The base template is intentionally minimal. Here are the most useful extensions, in order of impact:
- Dark mode: Add
dark:Tailwind variants and auseThemehook. Tailwind's built-in dark mode support makes this a 20-line change. - Link categories: Add a
categoryfield to each link object and group rendered cards under section headings. - Click tracking: Replace static
hrefvalues with short links from HitURL to get per-link analytics, geo targeting, and retargeting pixel support without touching your component architecture. - Animated entrance: Add Framer Motion's
AnimatePresencefor a staggered card entrance. Keep the animation duration under 300ms so it feels responsive, not decorative. - Social icons: Install
lucide-reactfor a lightweight, tree-shakeable icon set that adds less than 2kb to your bundle per icon used.
For a broader architectural perspective on how link-in-bio pages fit into a personal branding strategy, the complete introduction to link-in-bio pages is worth reading alongside this build guide.
Want a managed bio page with zero build time? Switch to HitURL today. Free to start, and you keep every feature that matters: click analytics, retargeting pixels, custom aliases, and a bio page that goes live in minutes at hiturl.at.
Frequently Asked Questions
Is Next.js overkill for a link-in-bio page?
Not if you already use it for other projects. The config-first approach described here keeps the codebase minimal, and you get static optimization, SEO control, and a deployment pipeline that pure HTML files cannot match without additional tooling.
Can I use this template without knowing TypeScript?
Yes. The walkthrough uses plain JavaScript JSX throughout. You can migrate to TypeScript later by renaming files to .tsx and adding type definitions to your config interface, but the base build runs without it.
How do I add a custom domain to my Vercel-hosted bio page?
In your Vercel project settings, navigate to the Domains tab and add your custom domain. Vercel provides the DNS records you need. Most domain registrars propagate the change within a few minutes to a few hours.
What is the difference between a static bio page and a dynamic one in Next.js?
A static bio page uses getStaticProps or reads from a local config file at build time. The HTML is pre-rendered and served from the edge. A dynamic version fetches link data at request time, which is useful if your links change frequently through an API but adds server response latency.
How do I track which links get the most clicks without a backend?
The most reliable approach is to replace your destination URLs with short links that include built-in click tracking. Tools like HitURL generate a short link that logs every click, device type, and location, and the data is available in a dashboard without any backend code on your end. For a full picture of how this fits into a broader link strategy, see the guide on link-in-bio SEO and analytics optimization.